Let's play 般若心経

研究日記です。

UE5で作り直し

11/9 研究室にいたハエを追い掛け回す

BLE Utilities V2がUE4.27のサポートを終了していたのでこの際解説する

Nineva Studios ←公式ドキュメント この記事はAndroid前提です。
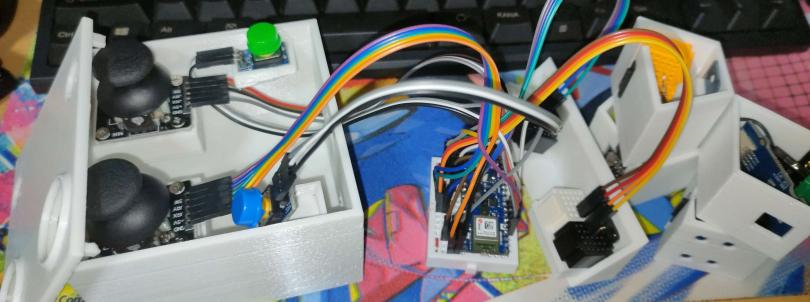
 

まずUIで接続テストなどをします。

UIのグラフの方でアンドロイド権限のリクエストとBLE Managerを作ります。

BLE ManagerはBluetoothの状態やスキャンしているかを持っています。


次にスキャンするのですが、Constructの後にすぐスキャンしてもおそらく失敗します。なのでボタンを作って押したらスキャンするようにします。

UUIDは短縮形を変換するやつを使って、Arduinoで設定したUUIDのみをスキャンするようにします。

(下の画像には無いですが、スマートロックのUUIDとコントローラーのUUIDが被っているのでBLE DeviceからGet Device Nameを取得し判別するようにしてください)


次にCharacteristicのサブスクをしましょう。Arduinoのプログラムに合わせて、作ったUUID分の登録します。ここでも、Forで一気にSubscriptionしてもおそらく失敗します。

ここではDo Nを使ってボタンを押すごとに購読します。2A37~2A44です

次は購読して送られてくるやつを読めるようにします。デフォルトだとByte文字列で送信されるのでHex文字列に変換するやつを使います。

Hex文字列を読める文字に変換します。nRF Connectを使って読んでみると以下のような感じになっています。

"496,515,506,523"とArduinoで送信した奴がHexだと34-39-36-2C-35-31-35-2C-35-30-36-2C-35-32-33になってます。このプラグインだとハイフンすら消えて送られてきます。
これは16進数とASCIIの変換をすれば読めます。

34(Hex) -> 52(Dec) -> 4(ASCII) のような感じです。なので2C(hex)は44(dec)なので、ASCIIだと","(カンマ)に該当します。

まずはHex to Decを関数にしてみましょう。2文字入ってくるのでそれぞれ10進数に変換し、十の位は16を掛けて足します。もっときれいに作れると思います。

返されたInt型をASCII変換するマクロを作成します。長いのでリンク先に置いておきます。

https://blueprintue.com/blueprint/d7rx6z13/

最後に、最初のHex文字列を2文字ずつに分けてHextoDec、ASCIIを通す関数を作って終わりです。


Notificationされたらこの関数を通して出力すると、Arduinoで送信した文字列が読めると思います。わかんなかったら連絡してください Discord : horikogasa

自作スマートロック

10/10(火) みんなテストのやる気ないみたいで私は2位でした。

研究室にスマートロックをつけてみたい

経緯:サーボモータ(SG90)が研究室に落ちてた。

バッテリー切れのときに手動で回せなくなるのは困るので、

左は鍵の模型

こんな歯車にします。歯車を回すと開閉ができますが、角度を戻すことで手動で回すことができます。

サーボモータに歯車を取り付け、ホルダーを作成したら取り付けます。


黒い方の歯車が落ちないように薄い板を貼り付けます。

有線給電

Arduino Nano 33 BLE Senseからサーボモータも3.3V給電して動作確認。

動画を見ればわかりますがトルク不足で動いてないです。4.7~6.0V推奨なのに3.3Vしか送ってないからだと思います。

SG90の高トルク版であるSG92Rにし、歯車の位置を微調整すると、3.3Vでも動きました。歯車の位置が悪かったのが大きいと思うので、SG90で良いと思われます。

バッテリー給電

単三電池4本で6Vを生み出し、Arduinoは別の電池で動かします。見た目はゴツくなりましたがすごい力強さで動きます。

2日後来てみるとバッテリー切れになってました。計測すると20mAだったので、Amazonの単3電池(1000mAhくらい。少ない)/ 20mA = 50h
50時間しか持たない計算になります。

Arduinoには低消費電力モードがありますが、そのモードではBLEが使えないので通信ができません。低消費電力で動き続けるBLEモジュールに、通信とArduinoのオンオフをやらせると良いのですが、めんどくさいのでパス。Seeed Studio XIAO nRF52840とか使えば良いのかなぁ。

バッテリー駆動にしてオンオフスイッチつけて動いたので、たまに使うおもちゃに落ち着きました。

10/13追記:Seeed XIAO BLE nRF52840を買いました

これでバッテリーがもうちょっと持つことを祈ります。サーボの待機電力がほぼないと思うので、画像のような感じになりました。

通常時でも消費電力がすごく少ないですし、DeepSleepモードで夜の間使えなくすればバッテリー持ちが伸びると思います。

iOSでもアプリを出したいですが、13000円は高いのでWebアプリ開発をしたいと思います。

センサの左右を判別する方法

10/3(火) 久しぶりの研究日記 鬱です

抵抗を使用する方法

コントローラにはセンサを2つまでつけることができますが、センサの種類だけがわかって左右どちらについたのかはわからないのです。

ぷちコンに応募したときは、照度センサと温度センサだったら照度が左で温度が右、のようにI2Cアドレスが大きい方が右みたいにしてました。なので、動画では左右逆にならないようにセンサを付け替えています。


これの解決方法として、センサとコントローラを接続するピンを5ピンに増やします。(VIN, GND, SDA, SCL, 抵抗)

コントローラ側で左右に違う値の抵抗を用意し、センサ側にもセンサごとに違う値の抵抗を用意します。接続したときはこの抵抗の和を通る電流をアナログピンで読み取ります。

この方法の欠点としては組み合わせを考えるのが大変なこと、アナログピンの読み取り精度が悪いと誤認すること(これはI2Cアドレスが分かるのである程度リカバリ出来る)、センサを作るのが大変になることです。
抵抗をたくさん用意する必要が出てきますし、組み合わせを作るのに抵抗の並列接続とかやりたくないです。

ソフトウェアI2Cを使用する方法

ArduinoやESP32には、ハードウェアI2CというデフォルトでSDA, SCLに割り当てられたピンがあると思います。それとは別のピンをI2Cで利用できるようにしたものをソフトウェアI2Cと言います。

ソフトウェアI2CはハードウェアI2Cより応答速度が遅いですが、この記事によると誤差みたいです。

よって、ソフトウェアI2Cを左、ハードウェアI2Cを右、のようにすれば解決です。I2Cを使う意味があまりなくなっていますが、気にしません。

明日は実際にソフトウェアI2Cを使ってみます。ハードウェアI2Cと同時に使えるのかも疑問です。

時間がない

8/27 CPU100度いって落ちるから掃除した

コントローラ完成

これを押し込んで

できました。採寸が大変でした。センサモジュールも一つ一つサイズが違います。

今まで印刷しては調整してきたゴミがこちらです。

プログラムを書こう

センサ4つとボタン2つとスティック2つの値をキャラクタリスティックで送ります。

クリックでコードを表示
#include <ArduinoBLE.h>
#include "DFRobot_VEML7700.h"
#include <BH1745NUC.h>
#include <Adafruit_VL53L0X.h>

// プロトタイプ宣言
String scanI2CAddresses(); 
void readAndSendButtonState();
void sendColorValue();
void readAndSendStickValues();
void sendLuxValue();
void sendDistanceValue();
void sendTempHumValues();


int stick1X = A0;
int stick1Y = A1;
int stick2X = A2;
int stick2Y = A3;

DFRobot_VEML7700 als;
BH1745NUC bh1745nuc(BH1745NUC_DEVICE_ADDRESS_39);
Adafruit_VL53L0X lox = Adafruit_VL53L0X();

BLEService sensorService("1221");
BLEStringCharacteristic luxCharacteristic("2A37", BLERead | BLENotify, 20);
BLEStringCharacteristic colorCharacteristic("2A38", BLERead | BLENotify, 20);
BLEStringCharacteristic buttonCharacteristic("2A39", BLERead | BLENotify, 5);
BLEStringCharacteristic stickCharacteristic("2A40", BLERead | BLENotify, 20);
BLEStringCharacteristic i2cAddressCharacteristic("2A41", BLERead | BLENotify, 10);
BLEStringCharacteristic distanceCharacteristic("2A42", BLERead | BLENotify, 10);
BLEStringCharacteristic tempHumCharacteristic("2A43", BLERead | BLENotify, 20);


void setup() {
  Wire.begin(); 
  Serial.begin(9600);
  if (!BLE.begin()) {
    Serial.println("starting BLE failed!");
    while (1);
  }

  als.begin();
  bh1745nuc.init();
  // 距離センサの初期化
  if (!lox.begin()) {
    Serial.println(F("Failed to boot VL53L0X"));
    while(1);
  }

  BLE.setLocalName("SensorBLE");
  BLE.setAdvertisedService(sensorService);

  sensorService.addCharacteristic(luxCharacteristic);
  sensorService.addCharacteristic(colorCharacteristic);
  sensorService.addCharacteristic(i2cAddressCharacteristic);
  sensorService.addCharacteristic(buttonCharacteristic);
  sensorService.addCharacteristic(stickCharacteristic);
  sensorService.addCharacteristic(distanceCharacteristic);
  sensorService.addCharacteristic(tempHumCharacteristic);

  BLE.addService(sensorService);

  BLE.advertise();
  Serial.println("Bluetooth device active, waiting for connections...");
}

void loop() {
  BLEDevice central = BLE.central();

  if (central) {
    Serial.print("Connected to central: ");
    Serial.println(central.address());

    // Scan I2C addresses and update the new characteristic
    String i2cAddresses = scanI2CAddresses();
    i2cAddressCharacteristic.writeValue(i2cAddresses.c_str());

    while (central.connected()) {
      if (i2cAddresses.indexOf("16") != -1) { // if VEML7700 is connected
        sendLuxValue();
      }
      if (i2cAddresses.indexOf("57") != -1) { // if BH1745NUC is connected
        sendColorValue();
      }
      if (i2cAddresses.indexOf("45") != -1) { // if SHT35 is connected
        sendTempHumValues();
      }
      if (i2cAddresses.indexOf("29") != -1) { // if VL53L0X is connected
       sendDistanceValue();
      }
      readAndSendButtonState();//ボタン
      readAndSendStickValues();//アナログスティック

      if (i2cAddresses.indexOf("45") != -1) { // 温湿度センサが接続されている場合
       delay((int)((1.0/30)*1000 - 15));  // 短いディレイ
      } else {
       delay((int)(1.0/30*1000));  // 通常のディレイ
      }
    }

    Serial.print("Disconnected from central: ");
    Serial.println(central.address());
  }
}

// 前回のボタンの状態を保存するための変数
bool previousButtonState[4] = {false, false, false, false};

void readAndSendButtonState() {
  String buttonsPressed = ""; // 押されたボタンの番号を格納する文字列

  for (int i = 0; i < 4; i++) {
    int pin = 2 + i;//D2+i
    bool currentState = digitalRead(pin) == HIGH;

    // ボタンが押された瞬間のみを検出
    if (currentState && !previousButtonState[i]) {
      buttonsPressed += String(pin);
    }

    // 現在のボタンの状態を保存
    previousButtonState[i] = currentState;
  }

  if (buttonsPressed != "") { // 1つ以上のボタンが押された場合のみ送信
    buttonCharacteristic.writeValue(buttonsPressed.c_str());
  }
}

void sendColorValue() {
  unsigned short rgbc[4];
  if (bh1745nuc.get_val(rgbc) == 0) {
    float maxVal = max(max(rgbc[0], rgbc[1]), rgbc[2]);
    float scale = 1.0 / maxVal;

    // RGB値を0~1の範囲にスケーリング
    float R = rgbc[0] * scale;
    float G = rgbc[1] * scale;
    float B = rgbc[2] * scale;

    // 小数点以下3桁にフォーマット
    char colorStr[50];
    snprintf(colorStr, sizeof(colorStr), "%.3f,%.3f,%.3f", R, G, B);
    Serial.println(colorStr);

    colorCharacteristic.writeValue(colorStr);
  }
}

void readAndSendStickValues() {
  int stick1X = analogRead(A0);
  int stick1Y = analogRead(A1);
  int stick2X = analogRead(A2);
  int stick2Y = analogRead(A3);
  char stickValues[20];
  snprintf(stickValues, sizeof(stickValues), "%d,%d,%d,%d", stick1X, stick1Y, stick2X, stick2Y);
  stickCharacteristic.writeValue(stickValues);
}

void sendLuxValue() {
  float lux;
  als.getALSLux(lux);
  String luxStr = "VEML7700:" + String(lux) + " lx";
  luxCharacteristic.writeValue(luxStr.c_str());
}

String scanI2CAddresses() {
  String detectedAddresses = "";
  for (int address = 1; address < 127; address++) {
    Wire.beginTransmission(address);
    byte error = Wire.endTransmission();
    if (error == 0) {
      detectedAddresses += String(address, HEX) + ",";
    }
  }
  return detectedAddresses;
}

void sendDistanceValue() {
  VL53L0X_RangingMeasurementData_t measure;
  lox.rangingTest(&measure, false);
  if (measure.RangeStatus != 4) {
    distanceCharacteristic.writeValue(String(measure.RangeMilliMeter).c_str());
  } else {
    distanceCharacteristic.writeValue("Out of range");
  }
}

void sendTempHumValues() {
  // Send measure command
  Wire.beginTransmission(0x45);
  Wire.write(0x24);
  Wire.write(0x0B);
  Wire.endTransmission();

  delay(15); // Wait for measurement to complete (max 15ms)

  // Request 6 bytes of data
  Wire.requestFrom(0x45, 6);

  // Read data
  byte data[6];
  for (int i = 0; i < 6; i++) {
    data[i] = Wire.read();
  }

  // Convert to actual temperature and humidity
  unsigned int rawTemp = (data[0] << 8) | data[1];
  unsigned int rawHum = (data[3] << 8) | data[4];

  float temp = -45 + 175 * ((float)rawTemp / 65535);
  float hum = 100 * ((float)rawHum / 65535);

  String tempHumStr = String(temp, 2) + "°C," + String(hum, 2) + "%";
  tempHumCharacteristic.writeValue(tempHumStr.c_str());
}


これをUEで取得してキャラクターを動かしてギミック作ってUIとエフェクトとサウンド頑張って動画撮って編集して終わりです。がんばろう

なつやすみ

8/19 コロナとかで時間を半分以上消し飛ばした

2つのキャラクタリスティックを同時に読む

クリックでコードを表示
#include <ArduinoBLE.h>
#include "DFRobot_VEML7700.h"
#include <BH1745NUC.h>

DFRobot_VEML7700 als;
BH1745NUC bh1745nuc(BH1745NUC_DEVICE_ADDRESS_39);

BLEService sensorService("1221");
BLEStringCharacteristic luxCharacteristic("2A37", BLERead | BLENotify, 20);
BLEStringCharacteristic colorCharacteristic("2A38", BLERead | BLENotify, 20);

void setup() {
  Serial.begin(9600);
  if (!BLE.begin()) {
    Serial.println("starting BLE failed!");
    while (1);
  }

  als.begin();
  bh1745nuc.init();

  BLE.setLocalName("SensorBLE");
  BLE.setAdvertisedService(sensorService);

  sensorService.addCharacteristic(luxCharacteristic);
  sensorService.addCharacteristic(colorCharacteristic);

  BLE.addService(sensorService);

  luxCharacteristic.writeValue("Initializing...");
  colorCharacteristic.writeValue("Initializing...");

  BLE.advertise();
  Serial.println("Bluetooth device active, waiting for connections...");
}

void loop() {
  BLEDevice central = BLE.central();

  if (central) {
    Serial.print("Connected to central: ");
    Serial.println(central.address());

    while (central.connected()) {
      float lux;
      als.getALSLux(lux);
      String luxStr = "VEML7700:" + String(lux) + " lx";
      luxCharacteristic.writeValue(luxStr.c_str());

      unsigned short rgbc[4];
      if (bh1745nuc.get_val(rgbc) == 0) {
        String colorStr = String(rgbc[0]) + "," + String(rgbc[1]) + "," + String(rgbc[2]);
        colorCharacteristic.writeValue(colorStr.c_str());
      }

      delay(500);
    }

    Serial.print("Disconnected from central: ");
    Serial.println(central.address());
  }
}

2つsubscribeしたら読めるみたいです。

16進数になっちゃってるので変換します。二文字ずつ区切って10進数に変換してASCIIに当てはめるプログラムを組みます。BPでやったのでASCII変換ノード載せときます。

ASCII Select posted by HoriKogasa | blueprintUE | PasteBin For Unreal Engine

スペースがSPCになっていますがいい感じ。上はカラーセンサのRGBです。

カラーセンサの値から色を表示してみる

RGB値をこんな感じにして送ってみます。

unsigned short rgbc[4];
      if (bh1745nuc.get_val(rgbc) == 0) {
          float maxVal = max(max(rgbc[0], rgbc[1]), rgbc[2]);
          float scale = 1.0 / maxVal;

          // RGB値を0~1の範囲にスケーリング
          float R = rgbc[0] * scale;
          float G = rgbc[1] * scale;
          float B = rgbc[2] * scale;

          // 小数点以下3桁にフォーマット
          char colorStr[50];
          snprintf(colorStr, sizeof(colorStr), "%.3f,%.3f,%.3f", R, G, B);
          Serial.println(colorStr);

          colorCharacteristic.writeValue(colorStr);

グラデーションするLEDをカラーセンサに近づけて

Set Color and Opacityでimageに色を入れてあげます。すると右の画像のように色が反映されます。

UEのバグでずーっと色反映されなくて悩んでいたのですが再起動したら直りました。よくある

理論的に詰まないことが分かったのでこれからコントローラのガワを作っていきたいと思います。

ほんとは自作基盤とか発注してやりたかったけど時間が無いので全部採寸していい感じに作りたいと思います。

プログラム羅列

7/27 最近UEもロケリも触ってない

Arduino Nano 33 BLE Senseでも動作するI2Cセンサのプログラムをまとめます。

I2Cスキャン

I2Cで接続されているセンサ類のI2Cアドレスをすべて検出します。センサが使えるかどうかのチェック用です。

クリックでコードを表示
//I2Cアドレススキャン
#include <Wire.h>

void setup()
{
  Wire.begin();

  Serial.begin(9600);
  while (!Serial);             // Leonardo: wait for serial monitor
  Serial.println("\nI2C Scanner");
}

void loop()
{
  byte error, address;
  int nDevices;

  Serial.println("Scanning...");

  nDevices = 0;
  for(address = 1; address < 127; address++ ) 
  {
    // The i2c_scanner uses the return value of
    // the Write.endTransmisstion to see if
    // a device did acknowledge to the address.
    Wire.beginTransmission(address);
    error = Wire.endTransmission();

    if (error == 0)
    {
      Serial.print("I2C device found at address 0x");
      if (address<16) 
        Serial.print("0");
      Serial.print(address,HEX);
      Serial.println("  !");

      nDevices++;
    }
    else if (error==4) 
    {
      Serial.print("Unknown error at address 0x");
      if (address<16) 
        Serial.print("0");
      Serial.println(address,HEX);
    }    
  }
  if (nDevices == 0)
    Serial.println("No I2C devices found\n");
  else
    Serial.println("done\n");

  delay(5000);           // wait 5 seconds for next scan
}

SHT35 (高精度温湿度センサ)

コマンドを送信することで16進数の値が返ってきます。(温度2byte+チェックサム1byte+湿度2byte+チェックサム1byte) あとはいい感じに計算します。

クリックでコードを表示
#include <Wire.h>

#define SHT35_ADDRESS 0x45
#define SHT35_MEASURE_CMD_MSB 0x24
#define SHT35_MEASURE_CMD_LSB 0x0B

void setup() {
  Wire.begin();        // join i2c bus (address optional for master)
  Serial.begin(9600);  // start serial for output
}

void loop() {
  // Send measure command
  Wire.beginTransmission(SHT35_ADDRESS);
  Wire.write(SHT35_MEASURE_CMD_MSB);
  Wire.write(SHT35_MEASURE_CMD_LSB);
  Wire.endTransmission();

  delay(15); // Wait for measurement to complete (max 15ms)

  // Request 6 bytes of data
  Wire.requestFrom(SHT35_ADDRESS, 6);

  // Read data
  byte data[6];
  for (int i = 0; i < 6; i++) {
    data[i] = Wire.read();
  }

  // Convert to actual temperature and humidity
  unsigned int rawTemp = (data[0] << 8) | data[1];
  unsigned int rawHum = (data[3] << 8) | data[4];

  float temp = -45 + 175 * ((float)rawTemp / 65535);
  float hum = 100 * ((float)rawHum / 65535);

  Serial.print("Temperature: ");
  Serial.print(temp);
  Serial.println(" °C");

  Serial.print("Humidity: ");
  Serial.print(hum);
  Serial.println(" %");

  delay(1000);
}

VEML7700(照度センサ)

このセンサはAdafruitのやつですが、DFRobotのライブラリなら動きました。有名なセンサだといっぱいライブラリあっていいですね。

クリックでコードを表示
#include "DFRobot_VEML7700.h"
#include <Wire.h>

/*
 * Instantiate an object to drive the sensor
 */
DFRobot_VEML7700 als;

void setup()
{
  Serial.begin(9600);
  als.begin();   // Init
}

void loop()
{
  float lux;
  
  als.getALSLux(lux);   // Get the measured ambient light value
  Serial.print("Lux:");
  Serial.print(lux);
  Serial.println(" lx");
  
  delay(200);
}

KP-VL53L0X(ToF式距離センサ)

このセンサは説明書にある「VL53L0X by Pololu」というライブラリでは動作せず、「VL53L0X by Adafruit」は動きました。そのスケッチ例を使えばOKです。

クリックでコードを表示
#include <Wire.h>
#include <Adafruit_VL53L0X.h>

Adafruit_VL53L0X lox = Adafruit_VL53L0X();

void setup() {
  Serial.begin(115200);

  // センサの初期化
  if (!lox.begin()) {
    Serial.println(F("Failed to boot VL53L0X"));
    while(1);
  }
}

void loop() {
  VL53L0X_RangingMeasurementData_t measure;

  // 距離データの取得
  lox.rangingTest(&measure, false); // 'false' は高速モードを意味します

  if (measure.RangeStatus != 4) {  // phase failures have incorrect data
    Serial.print("Distance (mm): "); Serial.println(measure.RangeMilliMeter);
  } else {
    Serial.println("Out of range");
  }

  delay(100);
}

BlinkM(RGB制御LED)

キャラクタリスティックを3つ(R,G,B)用意して、それぞれの値を0x00~0xFF(0~255)の範囲で送信して変えることができるプログラムです。

クリックでコードを表示
#include <ArduinoBLE.h>
#include <Wire.h>

#define BLINKM_ADDRESS 0x09

BLEService rgbService("19B10000-E8F2-537E-4F6C-D104768A1214"); // BLE RGB Service

// RGB characteristics
BLEUnsignedCharCharacteristic redCharacteristic("19B10001-E8F2-537E-4F6C-D104768A1214", BLERead | BLEWrite);
BLEUnsignedCharCharacteristic greenCharacteristic("19B10002-E8F2-537E-4F6C-D104768A1214", BLERead | BLEWrite);
BLEUnsignedCharCharacteristic blueCharacteristic("19B10003-E8F2-537E-4F6C-D104768A1214", BLERead | BLEWrite);

void setup() {
  Serial.begin(9600);
  while (!Serial);

  Wire.begin();

  if (!BLE.begin()) {
    Serial.println("starting BLE failed!");
    while (1);
  }

  BLE.setLocalName("RGB Controller");
  BLE.setAdvertisedService(rgbService);

  rgbService.addCharacteristic(redCharacteristic);
  rgbService.addCharacteristic(greenCharacteristic);
  rgbService.addCharacteristic(blueCharacteristic);

  BLE.addService(rgbService);

  redCharacteristic.setValue(0);
  greenCharacteristic.setValue(0);
  blueCharacteristic.setValue(0);

  BLE.advertise();

  Serial.println("Bluetooth device active, waiting for connections...");

//色勝手に変わるやつを止める
 Wire.beginTransmission(BLINKM_ADDRESS);
Wire.write('o');
Wire.endTransmission();
} void loop() { BLEDevice central = BLE.central(); if (central) { Serial.print("Connected to central: "); Serial.println(central.address()); while (central.connected()) { if (redCharacteristic.written() || greenCharacteristic.written() || blueCharacteristic.written()) { setBlinkMColor(redCharacteristic.value(), greenCharacteristic.value(), blueCharacteristic.value()); } } Serial.print("Disconnected from central: "); Serial.println(central.address()); } } void setBlinkMColor(uint8_t red, uint8_t green, uint8_t blue) { Wire.beginTransmission(BLINKM_ADDRESS); Wire.write('n'); Wire.write(red); Wire.write(green); Wire.write(blue); Wire.endTransmission(); }

夏休み中やるべきこと

今日は夏休み前最後の研究室だったので、あとは家でやるしかありません。
カラーセンサと3Dプリンター、ポゴピンなど届いていると思うので、研究室からはんだごてやセンサ類諸々持ち帰ってやりたいと思います。

以下やるべきこと

・UEでこれらのセンサの値を読み取る
・キャラクタリスティックを2個読めるのかテスト
・センサ付替え時になんのセンサが付いているか検知する
・ジャイロセンサからカメラ制御してみる
・コントローラを振り上げたときにジャンプできるようにする
・ポゴピンを使って統一規格にし、センサモジュールを作る
・電池駆動のコントローラを設計する
・オリジナルコントローラを使ったゲームを開発する

・信号処理のレポートをやる
・英語のレポートをやる
・数学のレポートをやる
・アパート見に行く


多いなぁ


I2Cで苦戦

7/26 大きなレポートの締切が近づいてきている

Writeしかできない

Arduino Nano 33 BLE Sense(Rev.1)ではライブラリの互換性の問題なのか、I2Cセンサの値が読み取れない問題が発生しました。
試したセンサは以下の通り。全部動きませんでした。(UNOでは動く)

・SHT35(温湿度センサ)
・VEML 7700(照度センサ)
・KP-VL53L0X(赤外線距離センサ)

昨日の記事でBlinkMのLEDにRGBの書き込みは出来たので、<Wire.h>だけを使ってプログラムを組めば問題ないのかな... ここでマイコンを変えるのはちょっと嫌

繋がっているセンサのI2Cアドレスを知るプログラムでチェックしてみます。

//I2Cスキャンプログラム

#include <Wire.h>

void setup()
{
  Wire.begin();

  Serial.begin(9600);
  while (!Serial);             // Leonardo: wait for serial monitor
  Serial.println("\nI2C Scanner");
}

void loop()
{
  byte error, address;
  int nDevices;

  Serial.println("Scanning...");

  nDevices = 0;
  for(address = 1; address < 127; address++ ) 
  {
    // The i2c_scanner uses the return value of
    // the Write.endTransmisstion to see if
    // a device did acknowledge to the address.
    Wire.beginTransmission(address);
    error = Wire.endTransmission();

    if (error == 0)
    {
      Serial.print("I2C device found at address 0x");
      if (address<16) 
        Serial.print("0");
      Serial.print(address,HEX);
      Serial.println("  !");

      nDevices++;
    }
    else if (error==4) 
    {
      Serial.print("Unknown error at address 0x");
      if (address<16) 
        Serial.print("0");
      Serial.println(address,HEX);
    }    
  }
  if (nDevices == 0)
    Serial.println("No I2C devices found\n");
  else
    Serial.println("done\n");

  delay(5000);           // wait 5 seconds for next scan
}

実行結果は以下のようになりました。

ちゃんと検出されていますね。悪いのはライブラリ説が濃厚になります。

センサのライブラリを使わないで値を読む

ライブラリが使えないので送信するコマンドはデータシートを見るなりして確認する必要があるのですが、SHT35(温湿度センサ)だとこのようなプログラムになります。

//SHT35 温湿度センサ
#include <Wire.h>

#define SHT35_ADDRESS 0x45
#define SHT35_MEASURE_CMD_MSB 0x24
#define SHT35_MEASURE_CMD_LSB 0x0B

void setup() {
  Wire.begin();        // join i2c bus (address optional for master)
  Serial.begin(9600);  // start serial for output
}

void loop() {
  // Send measure command
  Wire.beginTransmission(SHT35_ADDRESS);
  Wire.write(SHT35_MEASURE_CMD_MSB);
  Wire.write(SHT35_MEASURE_CMD_LSB);
  Wire.endTransmission();

  delay(15); // Wait for measurement to complete (max 15ms)

  // Request 6 bytes of data
  Wire.requestFrom(SHT35_ADDRESS, 6);

  // Read data
  byte data[6];
  for (int i = 0; i < 6; i++) {
    data[i] = Wire.read();
  }

  // Convert to actual temperature and humidity
  unsigned int rawTemp = (data[0] << 8) | data[1];
  unsigned int rawHum = (data[3] << 8) | data[4];

  float temp = -45 + 175 * ((float)rawTemp / 65535);
  float hum = 100 * ((float)rawHum / 65535);

  Serial.print("Temperature: ");
  Serial.print(temp);
  Serial.println(" °C");

  Serial.print("Humidity: ");
  Serial.print(hum);
  Serial.println(" %");

  delay(1000);
}

実行結果

これでライブラリが使えなくてもセンサの値を使えるようになりました。よかったです。

2万円の3Dプリンター

研究室で使っている3Dプリンターは100万くらいするOnyx Oneなのですが、夏休み中使うために片道1時間で研究室に行くのはやばいと思いました。そこで、10cm×10cmくらいの小さいやつが印刷できるTina2Sを買いました。(研究費ではない)

Tina2S

Onyx Oneは専用のOnyxというフィラメントを使うのですが、それは800cm³で29000円します。余裕でTina2Sが買えますね!

コントローラのガワはでかいので何回か研究室に行くことにはなると思います。